woodworking plans box
This post has been in the hopper for quite a while. I took and edited all the pictures, but didnt get to the text before getting buried in the holiday hoopla. After looking it over, I almost posted it without any text at all, but in the end I decided to go with some minimal writing. Here it is; I hope you enjoy it.
At my new school, we have a tradition that as part of each birthday celebration the teacher presents a hand made gift to the student. My gifts are wooden pencil boxes. Heres how they are made.
The first step is to groove the 1 1/2" by 1/4" oak strips that will make up the four sides of the box. Here the Stanley 45 is set up in "plow mode" using the off cuts from a previous box as a template for setting the planes fence and depth stop.

After securing the strip to the bench, the 1/8" groove is plowed in short order. The holdfast bridging arrangement allows me to clamp on the very edge of the strip without crushing the wood.

Next, the rabbets are planed in the stock that will be used for the bottom and the sliding top.

After the plowing and the rabbeting, a smoothing plane cleans things up.

Parts get cut to length on the miter box.

The sides get marked for rabbets.

The shoulders get cut...

...and the cheeks are split off with a chisel. I dont gauge for the cheeks, I just use the grooves to set the bottom of the rabbets - simply spanning the end grain between the grooves with a wide chisel and then removing the bits of waste at each end.

The rabbets in the ends of the top and bottom are cut using the side rabbets as depth gauges and then split off with the chisel. All end rabbets are cleaned up with a shoulder plane.

Test fit before glue up.

Heres the body of the box after glue up - the small scrap next to the knife is from removing the wood from the groove up in one end to allow the lid to slide on and off.

The lid has been fit, but is still extra long.

Starting the finger pull.

The lid is cut to length (this should always be done after finishing the finger pull - DAMHIKT):

The joints are trimmed with a chisel and smoothing plane.

My makers mark is added (you may have seen this photo in an earlier post).

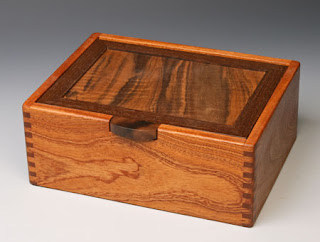
And here are some shots of the finished box.


Heres the tool kit for this project (minus the miter box and marking knife which somehow wandered off).

Do you find information about woodworking plans box are you looking for? If not, below may help you find more information about the woodworking plans box. Thank you for visiting, have a nice day.


0 komentar:
Posting Komentar